Friday, December 11, 2009

Scanning from the KIP

Here is how to get a PDF after scanning from the KIP

Use KIP Request


Signature Image

Here are the instructions for creating a digital signature image with a transparent background.

See: Your Signature Please

Friday, December 4, 2009

Unreconciled Layers

If you are annoyed by the "Unreconciled Layers" message you can turn it off by:

  • At the command line type LAYEREVALCTL and then 0 and Enter.

Solid Command vs. Solid Hatch

Ok, the debate rages on regarding using the Solid command vs Solid Hatch, here are some pro of using Solid hatch

Pros:
Way fewer points to pick
Hatch is associated with "boundary" objects
Can handle curved walls

Cons:
Sensitive to small gaps in line geometry

Layering Standards


Folder Naming Standards

to be completed.

Layout Naming Standards

...to be completed.

File Naming Standards

to be completed.

Creating Xref Titleblocks

The following outlines the procedure for creating the Xref Titleblock.
  • Type NEW at the command line and select the appropriate Wolski TB.dwt file.
  • Edit the project specific text, indicated by the orange arrows (erase arrows when done):

  • Type SAVEAS and save to the XREF folder as TB.dwg


  • At this point you need to open the working drawing and Xref this TB into the proper layout.(for instructions on creating layouts see Adding Layouts and Titleblocks

Notes:
Please note that Xref based Titleblocks are only used during the Working Drawing phase.

See Naming Standards & Folder Standards

Adding Layouts and Titleblocks

When you need to add a Titleblock layout, please use the Wolski Titleblock tool, it accomplishes the following:
  • Inserts a paper space layout setup to the correct paper size.
  • Inserts the correct Wolski titleblock.
  • Adds Wolski Page Setups for consistent printing (and batch printing using Publish).
Procedure:
Select the Titleblock tool and then select the desired titleblock based on the following codes:
      • SP = Space Planning
      • WD = Working Drawing
      • CA = Contract Administration  


Loading Wolski Layers

There are two ways to get access to the Wolski layers.

  1. Anytime you start a new drawing (or create a new drawing with the ~Wolski Blank Drawing.dwt template).
  2. Press the Layers button and then select Load All Layers.

Note: You might need the second option if you purge out the layers in a drawing.

For a list of all Woski standard layers see Layer Standards

Friday, November 27, 2009

Group Selection

Still hocked on groups? Here is how to ensure that they work properly in AutoCAD LT.
  • When you create groups it is important that you make them Selectable


  • At the command line type PICKSTYLE and set to 1 (this is a global "on" for selectable groups).
  • Plus you may need to press Ctrl Shift A to toggle the Group funtionality on and off.

Linetype Scaling Issues

Getting proper linetype scaling in AutoCAD can be a huge pain. Here are some suggestions on resolving linetype scaling issues.

  • Run the Wolski Setup tool
    This will ensure that the correct metric or imperial linetypes are loaded.
  • Remove Object Linetype Scaling Overrides
    1) Select objects and double click to display Properties Palette

    2) If the Linetype Scaling value is different than 1 or set to "VARIES", then set the value to 1.


  • Set Paper Space LTSCALE
    The Linetype scale in paperspace must be set to 0.5, you can accomplish by always using the Wolski tools when switching between model and paper space.
In case the tools don't produce the desired result here is the "manual approach"
In paperspace type LTS and set value to 0.5.
In modelspace type LTS and set the value to half the dimscale.
Example: 1/8"=1'-0" is a Dimscale of 96 and therefore an Ltscale of 48

Fixing Drawing Errors

This is a quick and easy way to fix any errors in your drawing.
I generally do this process when I'm purging my drawing.
After you purge, type in "audit" (enter) and then "y" (enter) to allow autocad to fix any errors. Once its done fixing, it will show you how many errors were in your drawing.
That's all. Nice and easy!

Friday, November 20, 2009

Tool Palette Tips

Here are some tips for maximizing your fun using Tool Palette.
  • Ctrl 3 is the easiest way to toggle palettes on (and off).
  • Control the display settings of your palette, right click in your palette and select View Options...:


  • Adjust the visibility settings as you desire (smaller icons will allow more blocks to be displayed).


Setting All Palettes ensures that the changes are applied to every palette.

Change Xref Path to Relative

Change to Relative Path
At times you may need to change a path from Absolute to Relative here is how you do it:

  • If Xref palette is not visible, type Xref at the command line.
  • Select reference and edit path as indicated below:
  •  

Relative Xref Pathing

Principles

  • All external references (including images) should use "Relative" paths.
  • A relative path describes where the reference is in relation to the current file:

Example:
 ..\Xref\Abc-file.dwg


Explanation:
Abc-File.dwg is located back one folder ("..")
and then forward in the Xref folder ("\Xref")

Procedure
  • Ensure that current drawing has been saved prior to attaching Xrefs.
  • When you can set relative paths when you attach a file: 


Bluebeam as Default PDF Program

Set Bluebeam as Default
Occasionally your computer might switch back to Abode Reader as the default PDF viewer (this occurs if Adobe Reader updates).
  • Start Bluebeam Administrator (Start button – All ProgramsBluebeam SoftwareBluebeam Administrator
  • Set to the Revu tab and check the Use as Default PDF Viewer and press OK

Bluebeam Deployment

Install Bluebeam PDF Revu
  • Install Bluebeam PDF Revu
Configure Bluebeam
  •  Start Bluebeam Administrator (Start button – All ProgramsBluebeam SoftwareBluebeam Administrator
  • Go to Net Config tab and change the location of Text Stamps to T:\Bluebeam\Stamps

  • When prompted to Copy files select No Copy and then press OK

AutoCAD LT 2009 Deployment

Install AutoCAD LT 2009
  • Install AutoCAD LT 2009 (with default settings).
  • Install latest AutoCAD LT 2009 Service Pack (from Install folder or Autodesk Support webite)
Configure Wolski Tools
(needs to be completed when new users log on to a system for the first time).
  • If you wish to disable the ribbon, press the Workspace switching button (lower right corner of screen). Set to AutoCAD LT Classic.


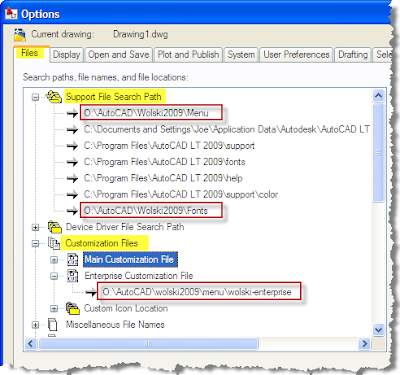
  • Start  the Options command (Shortcut: OP)
  • Set to the File tab and set the following settings (Important: In the support file search path getting the right order is critical).


  • Press Ok